Thursday, 17 December 2015

2 Crafty Chipboard December shares

I am up on the 2Crafty blog with my December layout shares 

 
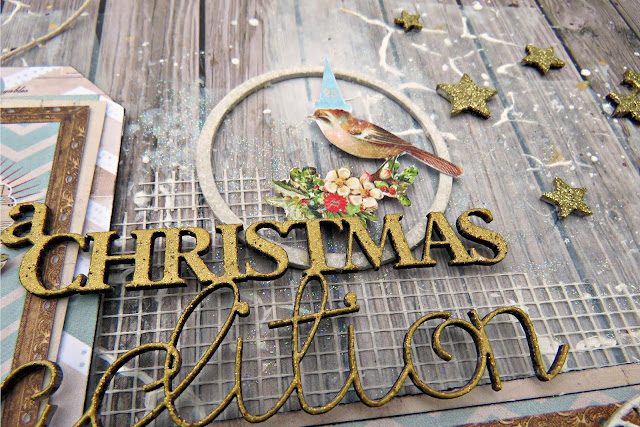
"Christmas Tradition"

Its always fun to scrap our festive pictures and preserve our own family traditions. In our 
family it is traditional for me to put my Grandaughter to bed on Christmas Eve, we put 
out some snacks for Santa and then I read her a story before she goes to sleep. She is
 getting older now and I know this tradition will soon end, mores the pity. 
2Crafty always have the perfect chipboard to record the occasion.
 

I inked the "Christmas Tradition" title with gold ink and then embossed with 
gold powder for a very sparkly look.
 

Isn't the "Mini Bauble Tree" just too cute? I used white acrylic paint then sprinkled 
some green embossing powder over, I gave some sharp taps so that the powder was
 uneven on the surface, this then allows for the white to seep through in some parts.
 

I used one of the pieces from the "Circles Set". I covered it in white glitter and placed it 
behind the title slightly. It also frames the little bird that I fussy cut from the patterned 
paper. I glittered some stars and scattered them around my page.
 
2Crafty Products used:
A Christmas Tradition title
ATC Hearts & Stars
6" Clock Frames
Mini Bauble Trees
Circles
Assorted Polaroid Frames


"Be YoursELF"

Last year I played the "Elf on a Shelf" as a bit of fun, I used the "Be Yourself" title 
for my page. I used a different colour on the Elf part of the word as a fun element.
 

I used the "Twig Stem" as a tree and embossed it with gold, for the "Reindeer" I painted it
 first with a coat of white and then some brown, whilst it was still wet I used a tiny dots stamp
 for the dots you see on young deers backs. I gave him a red nose and gold glittery antlers too.
 

 I framed my photo using the "Doodled Frame". The snowflakes are from the
 "Mini Weather Icons" set I simply added glue and then lots of glitter. 
 

I am loving the mix of gold and silver on my pages so I decided to coat the "lightbulb" 
 chippie with a silver embossing powder, I layered it between an "Ornate Snowflake" 
 and my title piece, I inked the element of the bulb in black for a little contrast.
 
2 Crafty have so many beautiful seasonal chipboards to choose from 
and they look fab on your pages.
 
2Crafty products used:
Twig Stems
Ornate Snowflakes
Mixed Border Strips
Young Reindeer
Be Yourself title
Doodled Frames
Lightbulbs
Mini Weather Icons

Thursday, 26 November 2015

Christmas Advent with Bo Bunny Dear Santa

Christmas is coming......


I wanted to make an advent calendar for this year and its no good waiting til December to start so I thought I would be all prepared. I came up with the idea of altering the actual box that these chocolates came in, of course I turned to Bo Bunny for some festive inspiration and chose to use the Dear Santa line for my project.

 
I cut pieces from lots of different sheets to use to cover the chocolates, then I cut the small numbered sheet up that came in the Dear santa 6 x 6 paper pad. I layered these onto the small rectangles then attached then in place.
 
 
I fussy cut some images for the center of the calendar and finished it off with a Happy Christmas Gold Foil Transfer. I love how the colours in this collection make everything looks so super festive.
Can't wait to share this with hubby on the 1st.

Bo Bunny Supplies Used;
Patterned Paper; Advent, Candy Cane, Festive, Sweater, Wonderland/Dear Santa
6 x 6 Paper Pad: Dear Santa
Foil Transfers: Gold Foil Sentiments
Stickers; Double Dot Tuxedo Alaphabet

Monday, 16 November 2015

My November shares for 2Crafty Chipboard DT


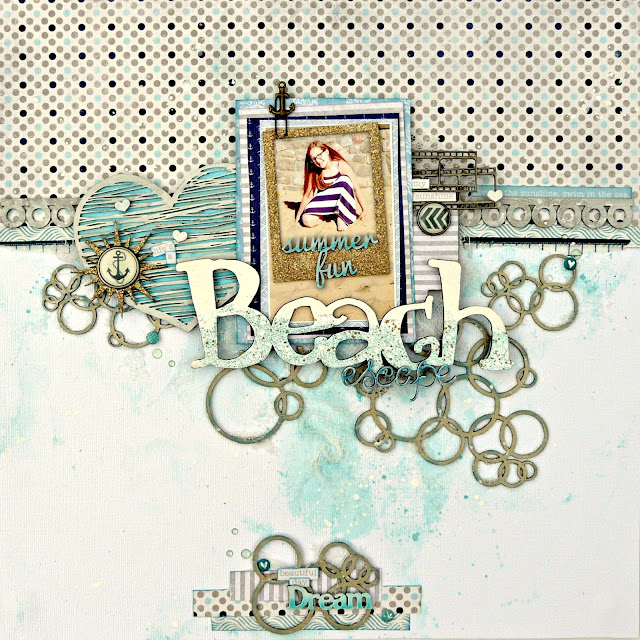
"Beach Escape"
beach escape scrapbook layout tracee provis 2crafty chipboard 01
 
Hey there 2 Crafty fans I am excited to be here to share with you two layouts that I 
created using the fabulous 2Crafty Chipboards this month. I have a short video tutorial
  to go with this first layout but please, bear with me as its my first attempt at a video.
 

I used chipboard pieces from 12 different chippie sets on my page, can you spot them all?
I used gold glittery embossing powder on the sun, taken from the Summertime Words Set
 and I used the same treatment on the Polaroid Frame that surrounds my photograph.


The Tiny Film Strips are perfect for tucking in and can help to add balance to
your pages, I left them raw and I think they look great this way.


I used two different embossing powders on the Beach title chippie, I explain this in
 a little more detail on my video. The words in the Mini Travel Word Sets are small and
 delicate and I glued the escape word to the title piece to elongate my title.
.
CLICK ARROW TO VIEW VIDEO
2Crafty products used:
Bubble Clumps
Beach Word
ATC Hearts & Stars
Assorted Polaroid Frames
Tiny Film Strips
Mini Travel Words set1
Multi Tab Assorted
Doodled Heart
ATC Words1
Mini Weather Icons
Word Circles set2
Mixed Border Strips


"The Very Best"
The Very Best scrapbook layout tracee provis 2crafty chipboard nov 2015
 
For my next page I used the Word Circles set 1 and a Dancing Sun
 to create a strip across the middle of the page.
 
 
I kept the circles quite muted but they are still a great focal point for the layout, in 
contrast I gave the Dancing Sun a coat of gesso and then used embossing ink with a 
white glitter embossing powder to give some sparkle.
 
 
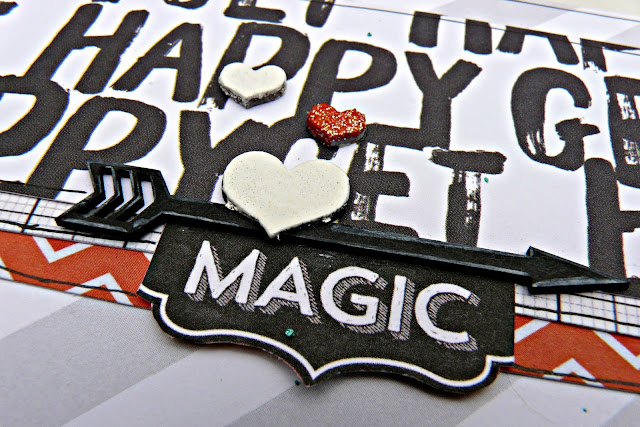
The Assorted Arrows are an essential set to have,  as I find myself using them on lots 
of pages, they just give that little extra something something to your work. I placed a
 piece of patterned paper behind the Fast Forward Arrow to create a little embellishment.
 Some string wound through the circles added the finishing touch.
 
2Crafty Products Used
Fast Forward Arrows
Assorted Arrows
Dancing Sun
Handrawn Stars


Finally, I'd like to share an additional layout I recently created for
 CSI: Color, Stories, Inspiration using this Case File:


"Busy Doing Absolutely Nothing"

 2Crafty Products Used
Triangle Set
Busy Doing Absolutely Nothing Title
Assorted Arrows
Clock Face Frame

Please remember to become a blog follower & leave a blog comment to
be eligible to go in our monthly draw for a great chippie prize pack.


Hope you have a Happy Scrappy day
Tracee x


Thursday, 29 October 2015

Misc Me Journal with Bo Bunny

I am not much of a "Project Lifer" but the Misc Me range by Bo Bunny gave me an idea to use one of the 8 x 9 binders as a photo diary, just highlighting the events of that month (I will be sharing the first few pages up on the Bo Bunny blog in a few days). In Bo Bunny's latest release they have the utterly fab Calendar Girl Collection perfect for the idea I had in mind.


I started by decorating the front of my album, I went for a gold and neutral theme taking advantage of the gorgeous Foil Rub Ons and new Foil Washi Tape.


I also used a laser cut word from the new "Celebrate" pack. I first gave it a thin coat of gesso to stop the chipboard absorbing the colours of my mediums, next I painted it all over using Buttercup Pearlescents. After this was dry I used another coat of Pearlescents in the Gold, this time I just painted the top half of the piece once again I waited til this was dry, it doesn't take very long at all to dry. I then added Gold Glitter Paste to the bottom half so it looks like it has been dipped in the glitter.


I layered up papers and pocket squares from the Calendar Girl Collection, I did add in a little of the glitter paper from the Whiteout collection, I wanted to make this cover all gold and glittery, I used the chevron Foil Washi Tape to hold my layers together. I die cut some tags using the Nested Tags Die to tuck into my layers, I finished off the page with gold foil rub ons for 2015.

I cant wait to fill up this little album with all the fun (and the not so fun) things that have happened to me this year, do pop back later to see my other pages.

                     Toodle Pip for now........

Bo Bunny Supplies used in this project:
Patterned Paper; January/Calendar Girl
6 x 6 Paper pads; Whiteout, Calendar Girl
Misc Me Journaling Cards; Calendar Girl
Stickers; Glitter & Foil Locale; Glitter & Foil Chevron
Washi Tape; Gold Foil Chevron
Laser Cut Chipboard; Celebrate
Foil Transfers; Alphabet Gold Foil
Glitter Paste; Gold
Pearlescents; Gold Buttercup


Saturday, 17 October 2015

My 2Crafty Chipboard layouts for October

 "Adventure"
 

Hi 2 Crafty fans today I am here to share with you a couple of layouts that I created using the fabulous 2 Crafty products.
The girls in my family are just as adventurous as the boys, this fun photo was taken just before they took to the tracks in Go-Karts.
 
 
2Crafty always have the perfect chippie for your pages, here I used the "Adventure" piece along with a mixture of words from the "Mini Travel Word sets 1 & 2". I inked them with black ink and gave them a coat of clear embossing powder for a glossy finish.
I also used lots of the "waste parts" from the various pieces, for instance the zig zag border pieces were from the "Harlequin Clumps". They looked really good rubbed over with a little Viva Décor Inka Gold (although in the silver colour variation).
 
 
I used a mixture of inks and paints on the "Harlequin Clumps" to give them an old distressed look. The tiny triangles are the negative parts from a border set that I didn't actually use on the page, I layered the explore word from the "Mini Word Set 1" over the top of the background piece and added some stamping to my background.
The "Fast Forward Arrow" is a great set to have in your collection as you can use both the positive and the negative pieces. I added more silver to my arrow and glued an enamel dot in the centre. 2Crafty have a great range of frames and one of my favourites is the "Chained Circles" that I used to frame my photo.
 
These are the 2Crafty Chipboard pieces used on this page.
Chained Circles
Mini Travel Words Set 1 & 2
Harlequin Clumps
Adventure title
Fast Forward Arrows
Multi Tab Assorted


"Fun Times"
 
Tracee Provis Fun Times Scrapbook Layout 2CraftyChipboard 01
 
 
The advantage of a Selfie taking family is that you get lots of neat photos to scrap, my Daughter and her Fiancé had fun taking these on s trip to the seaside earlier this year.
 
Tracee Provis Fun Times Scrapbook Layout 2CraftyChipboard 02
 
I love the "Bamboo Palm Tree" set but was struggling to think what project to use it on, twinned with a "Flamingo" it makes the perfect summer embellishment for my page. I used twinkling h2o paints to colour my Bamboo.

 I didn't want the flamingos legs and body the same colour so I masked off the legs with a post it note and used an orange glitter embossing powder for his body.
Once again I used the "Fast Forward Arrows Set", but this time the circles with the laser cut arrow shapes. I first painted them with gesso and then applied seafoam embossing powder, what the picture doesn't show properly is the slightly bumpy texture that this powder creates.
 
Tracee Provis Fun Times Scrapbook Layout 2CraftyChipboard 03
 
I also used an arrow at the top of my page but this one was taken from the "Assorted Arrows" set, I simply inked it with black ink and went round the edges with a white pen, I applied the same technique to the "Fun Times" title chipboard piece. I finished off the top section with some tiny hearts taken from the "ATC Hearts & Stars" set.
 
These are the 2Crafty Chipboard pieces used on this page.
Fast Forward Arrows
Assorted Arrows
Fun Times title
ATC Hearts & Stars
Bamboo Palms
Flamingos
 
 
Thank you for letting me share these projects with you and I hope you are inspired a little
to use 2Crafty Chipboard on your projects.

And remember, to find a 2Crafty stockist near you, drop an email to...
salesat2crafty@optusnet.com.au


Thursday, 17 September 2015

My 2Crafty Chipboard shares for September

   I am up with my layout shares for 2Crafty Chipboard, such fun working with these chippies


"Life Documented"
When I saw the  "Life Documented" title I knew exactly what photo I wanted to use. Whilst this photo of my three children was taken at Christmas time, by changing it to black and white it fits perfectly to sum up their characters.
 
 
I printed my photos small enough so that they fit into the "Medium Film Strip" chipboard piece which I simply inked black. I left each of their faces in colour for the centre of the Film Strip and the "Heart Clumps" framed the rest of the photo that was hanging out of the sides of the piece. I also just used ink on the Heart Clumps and by not using any gesso on them first the ink soaked into the chipboard and gave me the deep matte colour I was looking for.
 
 
I used a mixture of different shaped arrows from the "Assorted Arrows" sheet, I inked two and painted the third in white acrylic paint. The title chippie was prepared with gesso followed by grey ink and then I embossed with clear embossing powder. After all this was cool I then took a grid
 stamp and stamped over the top with Black Stazon ink, I love the effect it created. I tucked a 
"Mini Camera" into the embellishment cluster around the title.
 
2Crafty Chipboard used in this project. 
Life Documented Title
Mini Cameras
Assorted Arrows
Heart Clumps
Medium Film Strip
Mini Fast Forward Arrows


"Crazy About You"

 I can never resist the opportunity to scrap about the main man in my life, I am crazy about him, hence this "Crazy About You" title worked perfectly for my page.
 
 
 I gave a light coating of gesso to the title chipboard and then I roughly
 pressed into the embossing ink purposely leaving a couple of the edges dry to
 give an irregular look to the finish.
I lightly brushed a thin layer of gesso over the "Funky Arrow", I dabbed most of it off with
 a piece of kitchen towel as I didn't want it to be to bold but just to draw your eye gently to 
the photo, I added an inked "6 inch Circle Revolution Frame" to also draw your eye into 
the centre of the page. These frames are so versatile and work on a wide range of different style projects.
Finally a small painted heart from the "ATC Hearts & Stars" sheet was added to the cluster.


  I inked up a tiny heart from the "ATC Hearts & Stars" sheet and placed this in the centre of my "Mini Camera". I decided this looked to plain so cut a circle of patterned paper to place in between, doesn't it make the cutest embellishment?
I used some tiny chevron arrow shapes from the "Mini Fast Forward Arrows" to point at
 the "like" stamp that I had stamped on the paper.
Down the left side of the page I added a gessoed "Heart Stem" border strip alongside
 one of the pieces from the "Frame Journal" set.
 
2Crafty Chipboard used in this project. 
Crazy About You Title
6 Inch Circle Revolution Frame Set
Assorted Arrows
Mini Fast Forward Arrows
Mini Cameras
ATC Hearts & Stars
Frame Journal Set
Heart Stems


Thank you for letting me share with you and I hope you are inspired a little
to use 2Crafty Chipboard on your projects.

And remember, to find a 2Crafty stockist near you, drop an email to...
salesat2crafty@optusnet.com.au


Photobucket