Friday 9 December 2016

A very Retro Christmas with Authentique (Papermaze DT)

I am up on the Papermaze blog today with this post.

Happy Friday to you all, today I am here to share a Christmas mini book that I have created.
I finally got myself in the festive mode and not a moment too late as Christmas is almost upon us.


This book is sort of my version of December Daily, I like the concept but it doesn't really work for me, so I decided just to document December as and when things happen.
I used the Retro Christmas collection by Authentique, this collection has a fun mix of patterns and images from Christmas past.


I fussy cut the Santa head from the Newspaper Clips sheet and added him to my layered papers. The cute little sprinkles shapes are by Doodlebug and there are plenty in the pack for me to use on the inside pages as well. The 2016 are Thickers in a nice shiny metallic gold colour, I also used some Make It Merry stickers by Bella Boulevard added in here and there.

I will be back later in the month to share some of the inside pages of this 6 x 6 chipboard album.
Hope your Christmas preparations are going smoothly.

Wednesday 30 November 2016

You are awesome - with Pink Paislee for PapermazeDT

Today I am up on the Papermaze blog with this post.


Hi Tracee here to share with you today, I know that Christmas is fast approaching but I am not quite up to speed with it yet and so my layout today is still in summer mode. I have used Pink Paislee products from a few different collections.

You Are Awesome by Tracee Provis


My background paper is from the C'est La Vie collection, I didn't add any type of mixed media as the paper has it's own fading in places and I liked how it looked. 


These wood veneer ephermera pieces formed the "you" part of my title, I used the chipboard sticker awesome word from the thickers pack as well. I couldn't find the right green letters so I simply added some white ink to foam thickers and I achieved the perfect colour I was looking for.


I fussy cut lots of flowers from the #2 sheet of the Take me Away collection and I layered my title over them. I used more wood pieces this time from the Pink Paislee Citrus Bliss collection, how cute is the flamingo? I added a few gold chipboard accents and my page was complete.

I hope you have enjoyed your visit today 
For this page and all your papercrafting needs please pop over to the shop, the autumn sale is still on and there are plenty of bargains to be found.

Tuesday 15 November 2016

CSI case file 218 - solved

There is a new case file to play with over at CSI 

and here is my page


Debbi and I went on many trips together when I visited, but for this pic we went just to the entrance to where Debbi lives as it's just so pretty for a Selfie! This was the sensible one....as always there was a jokey one, to be scrapped at a later date!


EVIDENCE - CHOOSE AT LEAST 3 CLUES
  • Dots
  • Animals
  • Weather elements (e.g., clouds, raindrops)
  • Hearts
  • Speech bubbles
  • Leaves
  • Cards (e.g., journaling cards, those cut-apart cards on patterned paper, etc.
  • Circles
  • labels
  • Metal
TESTIMONY - CHOOSE AT LEAST 1 CLUE
  • Topic: Document something about the outdoors.
  • Presentation: Put your journaling in speech bubbles

I also used a sketch from Grand Divas Creative Corner, I also played along with the bonus challenge which this time was to use wood. I colored and added a little "tweet" bird from Studio Calico


I took some close ups on my camera but promptly spilled a cup of tea all over it, the memory card not my camera luckily! now it wont work so I took these pics on my phone so excuse the quality.


I used plenty of older stash on my page including the XOXO sticker from 2010 Bella Boulevard collection. My papers were mainly Echo Park For The Record II. The flair badge was from a set that I bought in the £1 shop, someties there are some cute bargains to be had! I cut the clouds from a Websters Pages 6 x 6 pad (Modern Romance collection).


My title "good day" is a 2Crafty Chipboard piece that I inked and then embossed, I layered this up with some papers and a small chipboard frame, I have a ton of these and am always reluctant to use them! not because I don't like them but more then they will all be gone lol I added a little stamping and texture paste in the background I can never usually get this how I "want" it but this time \I was quite pleased with the result.

I hope you enjoyed hearing about my page and I hope you will find time to play along with this case file. We would love you to visit the Color Stories Inspiration blog
See you there x


Monday 19 September 2016

Together Again Scrapbook page with Jillibean Soup (for Papermaze DT)

Hi I am up on the Papermaze blog today with a scrapbook layout featuring Jillibean Soup!

Hi Tracee with you today, I'm going to share a scrapbook page that I created with an older Jillibean Soup collection. Do ever see a collection that you missed first time round and wonder "how did that happen"?

Together Again

together again scrapbook page tracee provis papermaze

When I saw this sheet from the Sightseeing Stew collection I felt a plan forming. I used the soup label arrow stickers to point to where both my friend Debbi and I live, I used string to create trail that leads from one back to the other 

together again scrapbook page tracee provis papermaze 01

I used wood veneers and stickers also by Jillibean Soup.

together again scrapbook page tracee provis papermaze 02

I cut lots of elements from the various papers in the Sightseeing Stew collection, I punched holes in the top and threaded them onto more string to create a banner along the bottom of my photo. The globe was a cut file from the Silhouette store, I like that it adds effect without overshadowing the background paper. A few sequins for the finishing touch.
Thank you for stopping by today.

Supplies for this layout can be found over at the shop, and check out some of those older collections like me you might find a gem that you missed!


Wednesday 7 September 2016

Wedding fever...4 more sleeps

Its all Wedding fever around here, in 4 days time my eldest daughter is getting married and I have been tasked with... well might be easier to say what I haven't been tasked with lol
So whilst I am knee deep in wedding prep my blog will be rather quiet. I can't wait to share pics of the happy event soon....meanwhile


Life looks rather like this!
See you soon
Tx

Wednesday 24 August 2016

Over at Papermaze - At the Beach with pebbles Spring Fling Collection

I am up on the Papermaze blog today with this post.

Hi Tracee with you today to share a layout I created using the gorgeous Pebbles Spring Fling collection


I used the pastel and kraft tones in the paper to give a soft look to the bright beach huts in my photograph. My background paper is actually from an old Christmas line by MME. I used some texture paste through a stencil to add a little texture to the background.


Included in my goodies this month was a sheet of alpha stickers by Websters Pages, I was able to spell out both my title and my sub title with them. It's amazing how far they will go! I love to put tags on my pages and am always happy to see them in my pack.


I think my favourite paper in the Spring Fling collection has to be the the tiny hearts on the kraft coloured background, I was really loathe to cut this paper up. I fussy cut the little birdhouse, which perches nicely on the chipboard stickers that I found in this pack.


I loved working with this collection and I hope it inspires you a little.
For this page and all your crafting needs please visit the shop

Saturday 13 August 2016

CSI case file 209 - Solved

 This week I manged to squeeze in time to solve case file 209. Carrying on with Debbi & Tracee's great adventure. This pic is from 2013, the first time I visited, we both used the same pics and the same sketch but our pages are like chalk and cheese, you can check Debbi's out Here!

Here is the case file;


Here is my interpretation
I used all the clues and my testimony was 3 line poetry


For my background I used a 2010 paper from the Road Show by Fancy Pants, I added gesso, texture paste and mists to create a mixed media background. When it was dry I added sequins for a bit of sparkle.


I used this sketch from My Creative Sketches, to kick start my page


One of the clues was string so I created a frame around my smallest pic, the seahorse was cut from a Bo Bunny paper in the beach Therapy collection. For the metal clue I found a flair badge by October Afternoon that fit perfectly, as did the ships wheel paperclip. I found some tiny fish in a pack of felt stickers and I dotted a few in the waves, this served as both my fabric and animal clue.


I painted a Studio Calico wood veneer with white paint then cut a small piece of patterned paper for the sail, finally I inked around the edges. My title is a 2Crafty Chipboard piece and I inked it in an ombre style then embossed it with clear embossing powder. Another piece from the Beach Therapy collection created a sub title and I added some stitches to it.
I had great fun as always solving this case file.

Toodle Pip
Tx


Monday 8 August 2016

Stuck Sketches August sketch

I loved the sketch over at Stuck Sketches this month, so I decided to drag out some of my stash I have been hoarding and play along!

This was the sketch


and my take 

My new passion is walking, I got a FitBit for Christmas and it has changed my life! Sounds a bit daft but it's true, I became totally aware of how unfit I was, I'm rubbish at running but walking I can do for miles and miles.....


I was inspired to stitch on my page after I watched a video from this class by Ashley Horton. As I was documenting the fact that I walk I used my sketch pen to trace the footprints and I then stiched around the outline. I can see me doing this lots more!


I have lots of embellishments in my stash and I found a pack of Pink Fresh Studio cardstock die cuts and clustered them up on my page. I moved the Ampersand from the main cluster on the sketch over the to the middle of my 2 photos. My mantra is "Just Keep Walking", when my legs are tired or the weather is bad I repeat that over and over, til my walk is done.


When I was visiting Debbi last year I bought these cute owl stickers in Michaels, he adds a cute extra element down at the bottom of the page. I really went to town with different embellishments including some cork dots that I purchased on the same trip.
I followed the sketch quite closely, well for me anyways!

Thanks for visiting today
Toodle Pip
Tx


Lip Balm Purses with Pebbles Spring Fling collection

I am up on the Papermaze blog with this post

Hi Today I am going to share with you a simple project I created using my Cameo and a sheet of paper from the Pebbles Collection Spring Fling.

Lip Balm Purses by Tracee


These cute little purses are a perfect thank you gift for my Granddaughter to give to her friends after their sleepover, I created them using a cut file by Jennifer Wambach that I purchased in the Silhouette store.


As you can see the lip balm fits perfectly and the double sided Strawberry Fields sheet has a strawberry pattern one side and polka dots the other, did I mention I am a little addicted to polka dots?


I embellished them with a few wooden buttons and some enamel dots. I cut the "thanks" sentiments from the Me To You sheet and cut the side to fit the curve on the purse.

Friday 17 June 2016

2Crafty Chipboard June shares plus a Video

"It's the Little Things"


Hi 2Crafty Fans, I am here today to share with you a couple of layouts I created 
with the wonderful 2Crafty Chipboard. 

But before we start...
Please remember while your here be sure you have
become a blog follower & leave a blog comment to
be eligible to go in our monthly draw for a great chippie prize pack.


I snapped this picture almost by accident. Whilst at the beach I found a heart shape
 engraved on a pebble. I snapped the picture of me holding it and then I noticed 
Rodney, my dog in the background.....perfect!

I found the perfect 2Crafty title "It's the Little things". I first painted it with white gesso, 
and then added some sparkling snow embossing powder to make it stand out. I simply
 inked the circles from the "Mini Sampler 1" pack and added them to my layers.

I covered one of the hearts from the "Mini Sampler Set" in patterned paper.

After I had arranged my photo and chippies I felt that the right hand side was a little bare, 
so I added "chevrons", words from the "Card Word Set 2" and a small heart from the
 "ATC Hearts & Stars" set.
The large "Handrawn Heart Frame" was covered with first gesso then some mist.

Here is a video on my process.
CLICK TO VIEW

2Crafty Chipboards used;
Handrawn Heart Frames
ATC Hearts & Stars
Card Word Set 2
It's The Little Things title
Hearts


"#hashtagselfie"

I have had the "Collage Square Panel" in my stash for some time, these fun selfie pictures
 were a great match. Fellow DT member Debbi has used these same pictures this month, 
you can see her layout here.


I always save every piece of my chippies, sometimes if a part is going to be hidden I 
carefully snip it off and save it for another page, as I did with this small piece of  
"Fine Leafy Bush". I left this piece raw as the colour blended with the rest of my page.


I roughly inked the panel, then I snipped in half and placed either side of my photo. 
To some of the squares I added patterned paper and a few embellishments.


I love to add film strips to my pages and 2Crafty have a few different ones, I like these  
"Individual Film Strip" as they act as a great frame for your projects. I added some 
embossing ink to my "Clock Face Frame" and sprinkled on some clear sparkle embossing
 powder, by not treating my piece first this retains some of the raw chipboard colour.


I gave my title piece a coat of blue pigment ink then embossed with more of the clear sparkle
 powder, the camera really picks up the glitter in the embossing powder but in real life
 the glittering looks much more even and sparkly.

2Crafty Chipboard used;

Selfies Word Pack
6" Clock Face Frames
Collage Square Panel
Individual Film Strips
Fine Leafy Bush
ATC Hearts & Stars

Wednesday 18 May 2016

Kaisercraft Storybook collection at Papermaze

Today I am up on the Papermaze blog with this post.

Hi Tracee with you today to share a layout I created, using the Storybook collection by Kaisercraft


I loved this photo of my Granddaughter looking at the menu about to choose her pizza, but I struggled to find suitable papers... struggle no more, the Storybook collection was a prefect fit with images of books and clocks. I wanted to keep a light feel to the page and I tore the blue script paper to leave about an 8" piece, I then backed this onto white cardstock. I then layered up my cluster over the two edges.


I added some of the stickers from the Sticker sheet to create a title. I added some lacy white doilies to my layers, they always add a little something extra to your page I think.


I wanted to make a small focal point up in the top left corner. I used some scrap pieces I had laying on my desk, this is great way to use the last little bits of your favourite papers, I hate waste lol. 

I hope you enjoyed your visit with me today.
For all your scrapping needs please head over to the shop
Tracee x

Monday 16 May 2016

2Crafty Chipboard May shares

I am up on the 2Crafty blog with my May project shares you can see the post HERE

"Let's Hear It For The Boys"
 by Tracee Provis
lets hear it for the boys scrapbook page tracee provis 2 crafty chipboard may 01


Hi there 2Crafty fans, thanks for stopping by the blog today.

Before we get started..

Please remember to become a blog follower & leave a comment to
be eligible to go in our monthly draw for a great chippie prize pack.
The more comments you leave, the more chances to win. 

Hi Tracee with you today to share a couple of scrapbook pages, my first page only has 
a small amount of patterned paper and I simply let the fabulous chipboard do the rest.
 
lets hear it for the boys scrapbook page tracee provis 2 crafty chipboard may 02

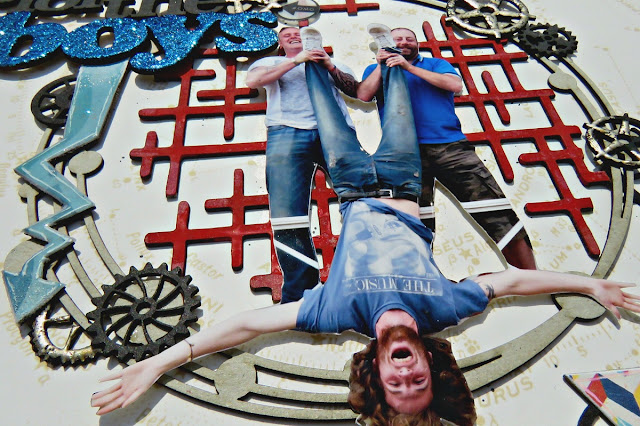
Whilst we were on vacation the boys got up to all sorts of fun and games, including dangling
 my son upside down, I couldn't resist cutting out this pic. I used the largest circle from the 
 6" Circle Dot Frame Set as a platform for the photo to stand on, I painted the 
Interlocking Grid Panel piece with red paint and layered this behind.

lets hear it for the boys scrapbook page tracee provis 2 crafty chipboard may 03

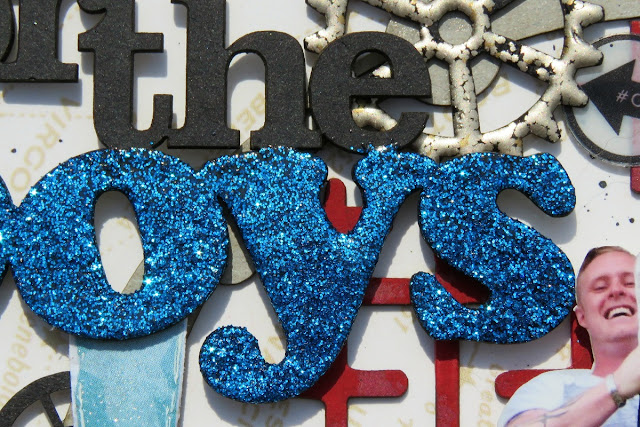
For the title I wanted the boys part to stand out from the rest so I inked the whole thing 
with charcoal ink and then I added blue glitter embossing powder to just the word "boys"
 and left the rest plain. I added in a Funky Arrow for a bit of interest, I pointed 
it downwards to replicate my son dangling down.

lets hear it for the boys scrapbook page tracee provis 2 crafty chipboard may 04

I used the same charcoal ink on my gears & I used both the medium and the small size sets.
I love that there are so many choices to get just the size you need. I have some aged silver 
embossing powder that I used on them and it gives a sort of mottled effect that is fab.


I added some paper covered triangles to give a little movement to the page. The word
 experience is from the Travel Word Disc set, I just cut the frame off and I can use
 that on another page.

2 Crafty Chipboard used:
Funky Assorted Arrows
Travel Word Disc Set
Lets Hear It For The Boys Title
Triangles
Steampunk Gears Medium
Steampunk Gears Small
6" Circle Dot Frames
Interlocking Grid Panel


"Right Here Right Now by Tracee Provis"
Right here right now scrapbook page tracee provis 2crafty chipboard bo bunny butterfly kisses 01

For my second page I found this picture of my daughter and her friend. There was lots 
of space around them and I thought it would be good to layer my title piece over it. I used the new Bo Bunny Butterfly Kisses collection for this page it worked beautifully with both my picture and the chippies.

Right here right now scrapbook page tracee provis 2crafty chipboard bo bunny butterfly kisses 02

I have had the Old Fence chipboard in my stash for a while, it worked perfectly with this 
picture, and after I had treated it with some gesso and various brown inks, I cut it in half 
and placed it either side of the picture. It actually looks like wood! I added some gesso to
 the Grass Clumps and placed those over the bottom of the fence chippie.

Right here right now scrapbook page tracee provis 2crafty chipboard bo bunny butterfly kisses 03

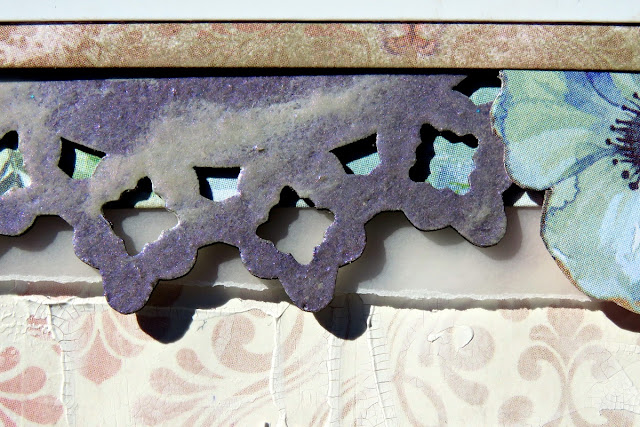
I added a Violet Pearl embossing powder to the doily piece, on this one the chippie was
 raw and it came out an actual violet colour but you will see in the next pic that if you
 add just a little gesso to the chipboard it reacts in a totally different way.

Right here right now scrapbook page tracee provis 2crafty chipboard bo bunny butterfly kisses 04

See here how over the gessoed parts it takes on a translucent tone that shimmers
 when the light catches it.

2 Crafty Chipboard Used;
Right Here Right Now Title
Grass Clumps
Old Fence
Dianne's Doily


I hope you have enjoyed your visit with me today and that you have a few ideas
 to try with your chippies, see you next month.