Wednesday, 26 March 2014

Pink Paislee Pen Pals

Hi Tracee with you today to share the projects I made with the fabulous Pen Pals collection by Pink Paislee.
I loved working with this collection! As you can see, this is a very versatile collection, suitable for just about any subject. The papers' palette is a wonderful mix of soft, neutral, and bold colours, and the patterns are so easy to combine. The embellishments are really great and varied too.


It was the "Love This" card that started the page below. I just love the pictures of my husband and me with our dogs, and that card called these pictures to mind. From there, the layout just fell into place, with the other heart elements and the Hugs and Kisses postal mark. The wood veneer shapes by Scrap365 were a perfect accompaniment. The pink and navy look so pretty together, and that awesome geometric background was a perfect backdrop.


I took a small snippet from one of the journaling cards and placed it to fit inside the wood love frame. I then cut one of the chipboard stickers in half  & layered it inside the frame for a sweet detail. 


I used the other half of the sticker over the paper that is coming out of the typewriter. I added both machine stitching and handstitching to the layout, always great for adding another texture to your page


I really love all the patterns in this collection and was looking for a way to showcase a bunch of them. The circle template, cut on my electronic die-cutter, was a great way to use many patterns without overwhelming the darling photo of my son.


The 3 x 4 pocket cards make great mats for your photo and are also good for just tucking in here and there. There are 3 sheets of stickers in the pack so you get plenty to choose from and they also look good layered up together. 


I cut the circle template was a great way to use up some of your small scraps and I wanted these papers to last for as long as possible as they are fabulous!. 


I used the same circle background to create this card. The typewriter was cut from one of the patterned papers. Framing it with the layered chipboard frame was a great way to make the typewriter stand out.
I could create for ages with this paper collection it really is awesome.
I hope you enjoyed my projects, I had a great time creating them

Tuesday, 25 March 2014

Follow Your Dreams

Today I am up on the BoBunny blog, sharing this dreamcatcher I created, using Washi Tape for the feathers


I decided to create a Dreamcatcher. They are such a fascinating concept. Catch Your Dreams--who wouldn't love that every once in a while? And rather than just use patterned paper or cardstock for my feathers, I decided that they would look great cut out of Washi Tape. Like a lot of us, I have an addiction to Washi Tape, so when BoBunny released their new Washi Tape I was in sticky heaven.


I first backed my Washi Tape with patterned paper from the Pop Quiz 6 x 6 paper pad. This way, if the feathers spin around they are pretty on the back too. I then ran them through my die cutting machine, but they could also be handcut for the same effect.


I took a Medium Sized Doily and cut the middle out, and then fixed it to acetate. The trickiest bit was getting the center circle in the right place. I first backed it onto some more acetate to give it rigidity to be able to sew through. I cut more circles from the patterned paper and Double Dot cardstock to cover any rough edges.


I cut lots of feathers in various patterns from the great range that BoBunny has, and wrapped the top with embroidery floss to make it look a little more rustic and also to catch hold of the thread that they dangle from.
I now have a lovely decoration to put in my scraproom tat will catch any dreams that may drift in through my window.

BoBunny Supplies:
Patterned Paper; Gift Shoppes/Silver & Gold
6 x 6 Paper Pad; Pop Quiz
Cardstock; Shadow Vintage Dot, Licorice Dot
Washi Tape; Black & White Patterned, Kraft Patterned
Doilies; Medium
Jewels; Happy Tails

Monday, 17 March 2014

Dance Frame

I just realised that I never shared this doily project I had up on the BoBunny blog a few weeks ago, I created this framed silhouette dance piece for my Grandaughter who is doing really well with her dance classes (that's not her trophy btw it's my hubby's who won a cycling competition in 2013), hope you like it.


There are always new trends in the Papercrafting world and some I skip right over and others are with me for a long time. Doilies happen to be a particular favourite of mine and I have incorporated them into lots of my creations. For this project they are the main focus and I have used them in a couple of different ways.


Firstly I used them to decoupage this plain wooden frame, I started by using gesso all over the frame, then glued pieces of them all around the edges, I used a further coat of gesso and then dry brushed some black paint to highlight the patterns. Finally I sprayed some gold mist to give it an aged look.

You can paint or spray the doilies (taking care when they are wet that you don't break them), I chose to do both here and I then used the sprayed ones as a mat for my silhouettes and the painted ones I tucked around the inside edges of my frame. A fairly simple project with a striking result don't you think?

Bo Bunny Supplies:
Patterned Paper; Cozy/Woodland Winter; Boyfriend/Head Over Heels.
Cardstock; Licorice Stripe/Doubledot
Doilies; Medium, Large

Saturday, 15 March 2014

Hello and welcome to our Back to Basics Blog Hop - part II...Awash With Colour!

Joining us on this hop are the lovely ladies from the Pan Pastel UK design team who work with these glorious dry pigment colours on a daily basis. 


We were lucky enough to be given some to play with too - think chalk (without the dust) but creamier and easy to blend, in a host of colours each with four tonal shades; Pan Pastels have had us all ooh and aahing at Scrap365 HQ!

Premium Craft Brands have donated a fantastic set of Donna Downey Pan Pastels for the lucky winner of our Blog Hop prize draw :)


I was so excited to get to play with these fun colour pigments.
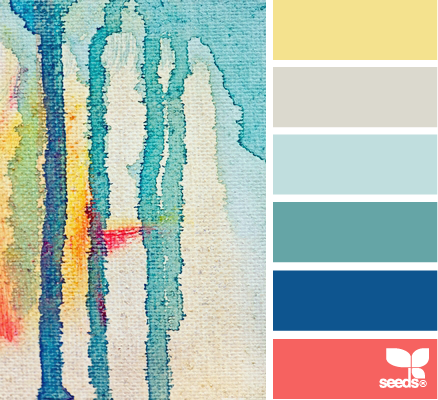
We were asked to pick a palette from http://www.design-seeds.com/ and this was the palette I chose


And this is the Art Journal page I created with them

There are so many things you can do with the pan pastels and I wanted to try out a few techniques, art journal pages are a great way to put some new ideas to the test.
My favourite way to use them was to brush them over stamped images/sayings.


If you stamp your image with a versamark ink pad then gently brush on the pan pastels it picks up the details of the stamp beautifully (here my page was a little wrinkled so the stamped image didn't come out perfect) I also used a grid stamp with the same technique.


I took one of the scrap365 wood veneers that have been featured on the blog this week and first embossed a diamond pattern with clear embossing powder then I blended various different colours until I got the shades I was looking for.
For the red patterns I used a stencil and then outlined it with a black marker.
I hope you enjoyed my project and I can certainly recommend an investment in some of these gorgeous Pan Pastels
your next stop is Claire


and here is the list just in case you get lost:

Scrap365 and Ali's post - HERE!
Nikky Hall - http://nikkyhall.com/


Natalie Macdonald - http://njmacs.blogspot.co.uk/

RETURN to Scrap365 to leave a comment for the prize draw :) - http://scrap365.blogspot.com/


Sunday, 9 March 2014

Woodness Gracious Me

(warning photo heavy)I was up on the Scrap 365 blog yesterday with this little minibook using some gorgeous wood veneers from Scrap365 themselves & the so so pretty Primrose collection by BoBunny.
I didn't share all the pages on the blog so I will share them here.
With so many shapes to choose from I finally went with the Dress forms and the polaroid frames.

This is the front cover

I love the colours the shapes give to a project just bare or you can decorate them simply, I added some dry wall tape to the dress form to give it some texture in contrast to the printed polaroid frame
On this frame I inked up the edges and embossed with clear embossing powder, some of it adhered without the ink underneath and it looks like water droplets.
Another that I double embossed and although you cant see too clearly in the picture this has a beautiful sheen whilst still showing the gorgeous laser details on the embellishment. How gorgeous is the Primrose Collection too with its pinks greens and browns?
 I added the frames throughout the book, sometimes to frame the photo and others to just highlight a part of one.
  and these are the double pages


The front and back cover, and I have to say that it was well received by my youngest daughter


If you made it this far well done and Thankyou for looking
Toodle Pip x


Saturday, 8 March 2014

Bo Bunny Happy Tails

I am up on the Bo Bunny blog today, with a layout using the fun Happy Tails collection.

My Best Friend by Tracee Provis


When I saw the new Happy Tails collection I felt sure Bo Bunny had designed them "just for me".  I took the My Buddy sheet cut in half, flipped one half over and rejoined it with some of the gorgeous washi tape which then made the perfect background for my water mad Colliedoodle Rodney.


My cluster around the main photograph is made up of elements from the matching Noteworthy, Brad and 12 x 12 Combo sticker sheet. To give it that final finishing touch I added a little more Washi Tape, and the Jewels make the perfect "sprinkles" to give it a little sparkle.


On the other side of the page the printed polaroid frames are already beautifully detailed and don't really need a lot adding to them for them to look complete. I couldn't resist adding the XO sticker from the Head Over Heels collection. There is no waste with Bo Bunny products as you can see I cut one of the Happy Tails labels from the edge of the paper to add under one of my photos

Bo Bunny Supplies
Patterned Paper: My Buddy, Bow Wow, Happy Tails/Happy Tails.
6 x 6 Paper Pad/Happy Tails
Brads: Happy tails
Combo Stickers: Happy Tails, Head Over Heels
Stickers: Cardstock Sticker, Woodland Winter, Happy tails; 12 x 12 Combo Sticker; Happy Tails, Head Over Heels
Noteworthy: Happy Tails
 Chipboard: 12 x 12 Happy Tails
Washi Tape: Kraft, Black & White Patterned
Jewels: Happy Tails